Wednesday, September 30, 2020

Week 5 - Composition


Reference Images
I chose the classic Rule of Thirds composition, with my rocket depot/outpost/station centered, the Mannequin coming over the foreground to the right, and the ship approaching from the left. My composition was inspired by the concept image above.
Beauty Pass
Normal, Toon, ID, AO passes
I began by laying some basic splash tones over the beauty pass. 
Using the ID map as a selection tool I started introduced greater variation in value, saturation, hue, etc.
Background kit bashed with some images of real mountains, and a very faint gradient overlay to introduce a snow haze.
Exposure and Levels adjustments to bring balance value across the image.
Grid to show the thirds of the image, as well as the line that I hope the viewers eyes follow from one side of the image to the other.
With Toon Shader on top.
Final Render.


Monday, September 28, 2020

Crate Modeling - Stage 1


We began our 3 week process of developing a crate asset in Maya. 1st step was setting up a proxy crate that can be used to establish a scale relationship between UE4 and Maya. 
Nice.
From there, through the process of duplicating "board" pieces, beveling edges, and using the original proxy as a spacing/scaling template, we arrived at this Crate, ready to be imported into ZBrush. 
Scale next to UE4 Manny. 
Render Shot.

Wednesday, September 23, 2020

Week 4 - Lighting with Arnold


Models Provided by Nick Zuccarello. Rendered with Arnold in Maya. 


ID, AO, and Normal

Modeled and posed myself.


Thursday, September 17, 2020

Common Art - Value and Contrast

This week we were exploring value and contrast in illustrations, using Maya as a staging tool, as well as a quick selection and value cheat sheet of sorts. 

To start, I staged the scene a bit differently than the example given to us by Nick. I positioned the camera in profile to the truck as if looking up at the UE4 men from eye level. 
ID Pass
AOV Pass
This screenshot shows an example of how the ID mask served as a masking tool, allowing you to select shapes and parts of the shot that aren't naturally easy to select thanks to their placement. These selections builtout all of the masks I used on my gradient and solid color layers and eventually resulted in....
This! The scene I tried to illustrate was a cyberpunk/future police force at a stop/incident. The trucks would be transports for a sort of droid force that would have different specializations/responsibilities based on their colors. The purple and pink tones lended themselves to "cyperpunk" but made a natural complement to the purple that occurs from red and blue police lights.

Monday, September 14, 2020

Week 3 - Legos - Part 1: Construction


This week we chose a Lego set to reference (below) and recreate in Maya before importing and constructing in UE4. Seeing as assets can be duplicated and mirrored as needed, I only made 1 of each unique piece.

I began with a simple 2x1 thin rectangle that would function as my ruler for the rest of my pieces. From here they were a simply a matter of finding how many blocks long, wide, and tall each piece would be. 
Finished Proxies of each unique piece. 
Examples of what my detailed pieces would look like, most obviously featuring the iconic Lego tops, as well as beveled edges and any other unique details. 

Thursday, September 10, 2020

Common Art Assignment 2 - Main Ship Silhouettes


This week we were provided with a ship model and given the task of creating 9 new unique silhouettes to form with either deforming or just including basic shapes into the overall shape.

I simply duplicated the original 9 times over and modified each one drawing inspiration from Star Fox, Star Wars, F-Zero, and general design tropes of what conveys "fast" "strong" "Villain" etc.

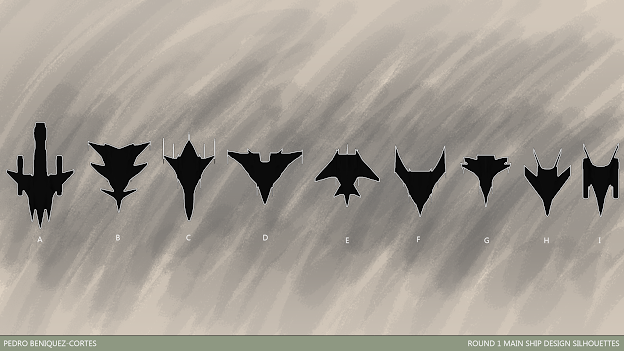
Screenshot of the 9 ships from above in Maya, with the background set to grey and the lights turned off. 
My personal characterizations of each would be:
A- The silhouette only shows the top side but the idea was 2 ships with 3 seats each are joined together by single extra large rocket booster. The idea being the 2 ships can be carried with up to 6 crew members across a vast distance without using the fuel of the fighters themselves. 
B - A villainous design featuring a more wicked silhouette with more wings and more dynamic sharp point from front to back.
C - A heroic design with rounder edges, the triangular shape on the rear suggesting a cone of exhaust, and therefore straight-line speed. The rounder front tip provides a stronger image, and overall the ship was larger than most of the others. 
D - Stout but nimble fighter; quick to turn around and fire back at an enemy behind them, but lacking the armor of a beefier ship. 
E - Another villainous design with a wings angled to the front aggressively. Would function like ship D in combat, agile and nimble. 
F - Stealthy and cool, this ship silhouette was inspired by the B-2 Bomber
G - Blatant X-Wing inspired ship concept, but with curved wings that would form a helix instead of a straight forward X. 
H - Another Heroic Design, simple and cool, and easily identifiable. 
I - Functionally more of a rocket than a ship thanks to the lack of wings. The idea being that this ship would blast in a straight line incredibly fast and then pitch and roll 180 degrees around and go back. 

Monday, September 7, 2020

3D Art Week 2 - Minecraft


One of the final renders of my scene, a simple beach shoreline with a sand castle and some coconut palms.

Started out with a simple beveled cube in Maya. UV's were laid out and then brought to and from photoshop to get a visual on which face lined up to which. 
An example of how my Sand blocks would be textured, with the top row featuring the top and bottom faces of the sand. 

Imported my minecraftblocks into unreal and laid them out in a grid to start. From here I adjusted their position to form some sand dunes and dropped some off to create the sand that is beneath the water.
My water material used the same base node structure as our previous M_Cube material, but with the blending mode set to Translucent, and the lighting mode set to Surface_TranslucencyVolume. This allows for the material to be reflective, while also allowing light to pass through it. 
I also set the World Position Offset for this water material so it would rise and fall like calm waves. 


Portfolio 3 Week 3 - Ember's Textures

 To be frank I did fall behind on Ember this week thanks to multiple real life factors + other school obligations + end of semester burn out...